DIY Fence Staining Made Simple – Tools, Tips, and What to Expect

Full Interior and Exterior Paint Helped This Windsor Home Sell for More!
August 18, 2025
Fall Home Painting Checklist for Sonoma County Before the Rainy Season
October 2, 2025
How to do it right—and make it last
If your wood fence is looking dry, faded, or weathered, a good staining can bring it back to life and protect it for years to come. This is one of those homeowner projects that most people can handle with a little planning, a few tools, and a weekend of solid effort.
Done properly, staining your fence boosts curb appeal, increases the wood’s longevity, and gives your whole yard a cleaner, more finished look. This guide walks you through how to do it the right way—without overcomplicating things.
Choose the Right Type of Stain
Before you start buying gallons of stain, figure out what kind of look and coverage you want.
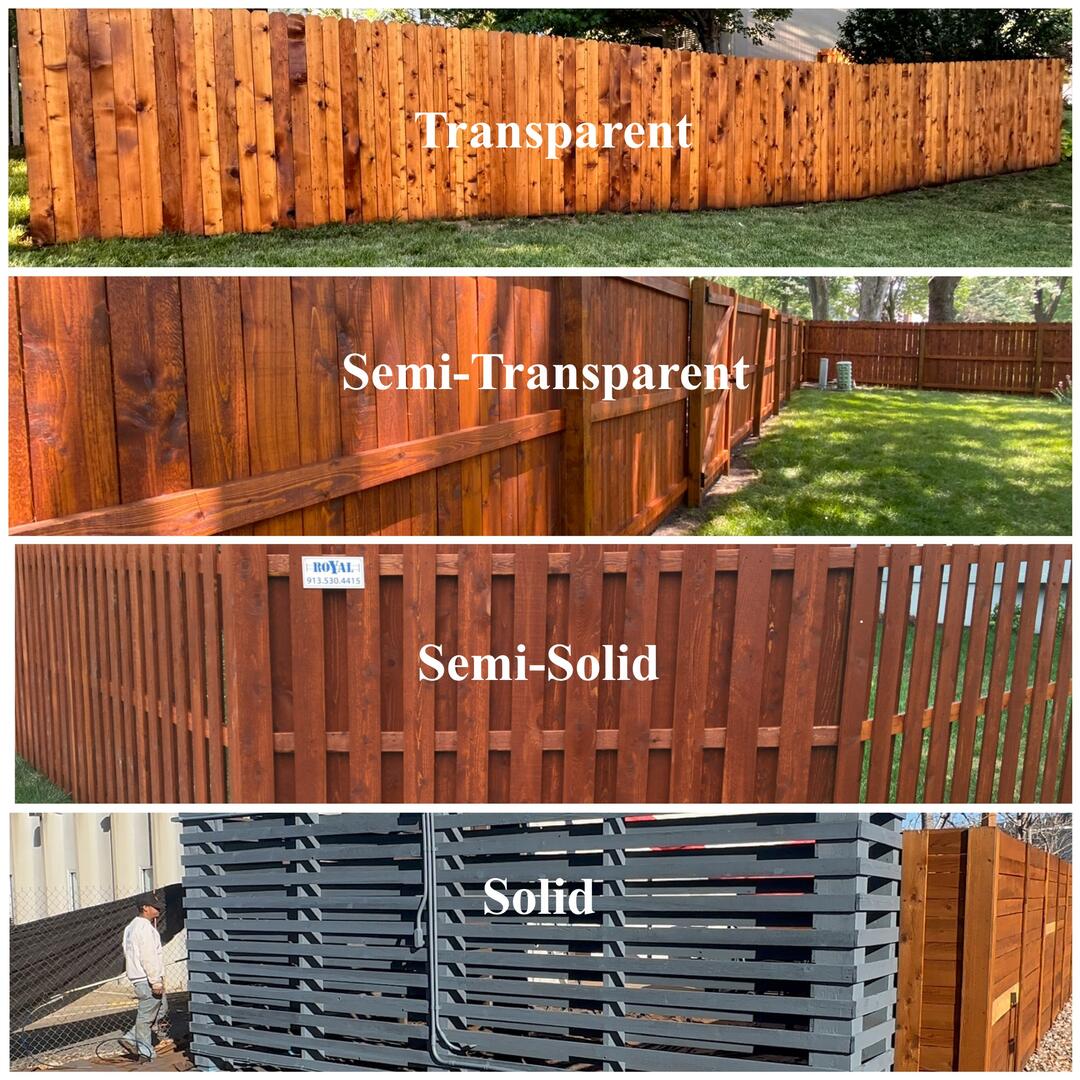
You have three main choices:
-
Transparent stain
-
Shows off the natural wood grain
-
Best for newer fences in good condition
-
Requires more frequent reapplication (every 1–2 years)
-
-
Semi-transparent stain
-
Adds a hint of color while letting some grain show
-
Good balance of coverage and longevity
-
Lasts about 3–4 years
-
-
Solid stain
-
Acts more like paint: rich color, full coverage
-
Hides imperfections and discoloration
-
Lasts 4–5 years or more
-
Pro tip: If your fence is gray, patchy, or uneven in tone, go with a solid or semi-transparent stain. Transparent stains work best on fresh, clean wood.
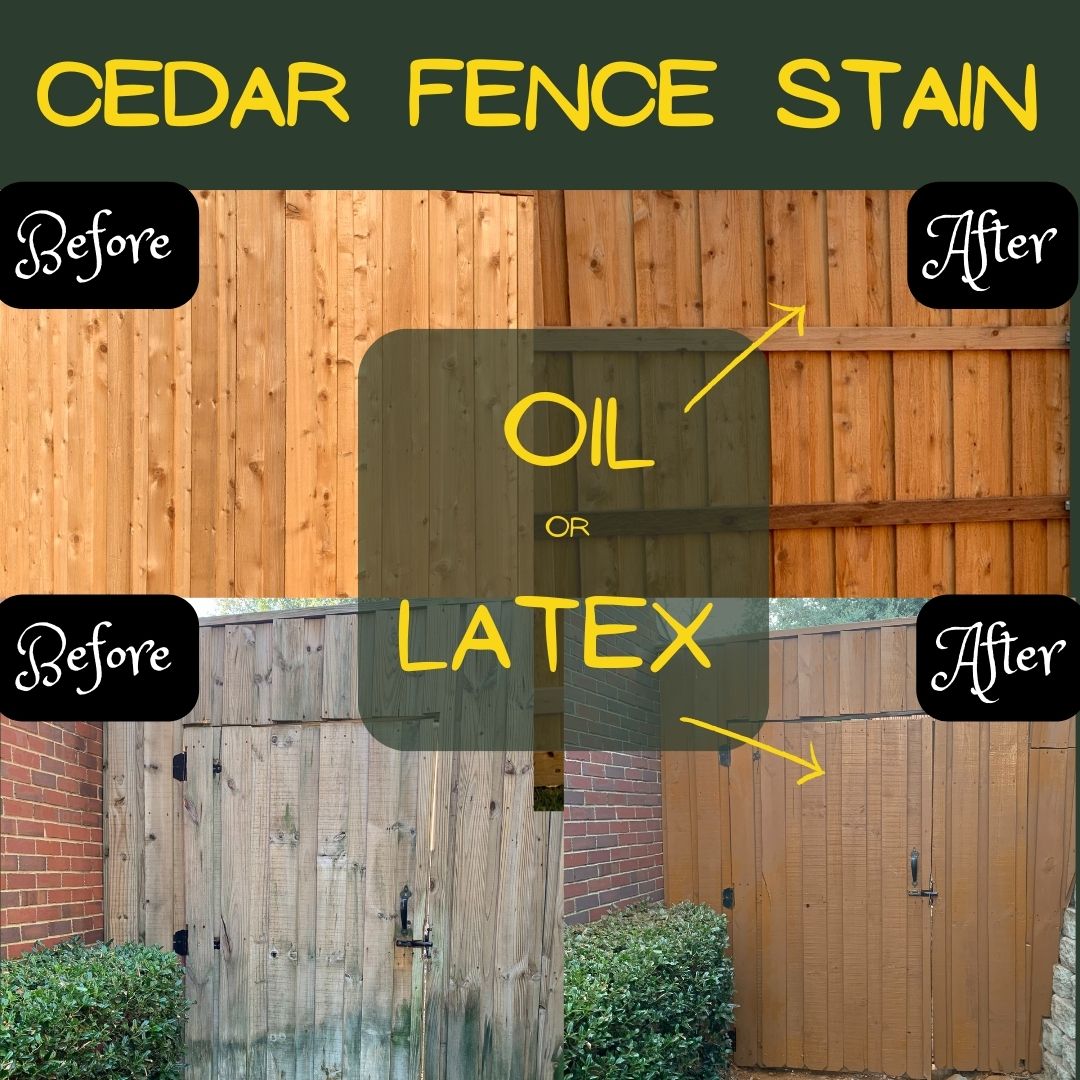
Oil-Based vs. Water-Based (Latex)
Both options can work—it really depends on your goals and what you’re comfortable working with.
| What You Care About | Choose This Type |
|---|---|
| Deep, rich color & better penetration | Oil-based |
| Easier cleanup & lower fumes | Water-based (latex) |
| Long-term durability | Oil-based |
| Quicker drying time | Latex |
| More eco-friendly (low VOC) | Latex |
Oil-based stains tend to last longer and soak into the wood better, but they take longer to dry and require mineral spirits for cleanup. Latex stains are more forgiving for beginners and dry quickly, but may need to be reapplied a bit sooner.
What Color Should You Stain Your Fence?
If you’re stuck deciding on a color, here are some things to think about:
-
Neutral tones like cedar, walnut, or driftwood gray work well with most homes and landscaping
-
Darker stains tend to fade slower and hide dirt better
-
Lighter colors brighten the yard but may show wear faster
-
If your home has a modern look, try charcoal, black, or cool grays
-
For a rustic or traditional feel, go with redwood, honey, or natural cedar
Still not sure? Buy a sample size and test a small area on your fence before committing to a full gallon.
When Should You Stain a Fence?
Timing matters more than most people realize.
The best time of year to stain a fence is late spring or early fall, when daytime temps are between 50–85°F and there’s little to no chance of rain. You want:
-
Dry weather for 48 hours before and after staining
-
Low humidity (ideally under 60%)
-
No direct blazing sun (causes stain to dry too fast)
Avoid staining during heat waves or in early morning when dew might still be present.
And if your fence is brand new?
Wait at least 3–6 weeks before staining. This allows the wood to dry out and better absorb the product.
What You’ll Need (Supply Checklist)
Here’s what to gather before you get started:
Materials
-
Exterior wood stain (type and color of your choice)
-
Primer (if needed—some stains require it for old, previously coated wood)
-
Drop cloths or plastic sheeting
-
Painter’s tape
-
Replacement boards or nails for minor repairs
Tools
-
Pressure washer or garden hose + stiff bristle brush
-
Paint sprayer, roller, or wide brush
-
4–6” brush for edges and detailing
-
Gloves and mask (especially for oil-based stains)
-
Stir sticks
-
Ladder (for tall fences)
Have everything ready before you start so you’re not scrambling halfway through the job.
Step-by-Step: How to Stain a Fence
1. Clean the Fence
Use a pressure washer on a low setting (or just a hose and brush) to remove dirt, mildew, and old residue. Let the wood dry for 24–48 hours before moving to the next step.
2. Inspect and Repair
Look for damaged boards, protruding nails, or loose pickets. Fix or replace anything that needs it. There’s no point in staining over rot.
3. Protect the Area
Move planters, decor, or rocks away from the base. Use plastic sheeting or painter’s tape to protect anything nearby—especially if using a sprayer.
4. Stir the Stain
Give it a good mix. Don’t shake the can—it creates bubbles. Stir every so often while working to keep the color consistent.
5. Apply the Stain
Pick your tool:
-
Sprayer – Fastest method, but practice first if you’re new to it. Always follow up with a brush to work the stain into the grain.
-
Roller – Good for wide, flat panels.
-
Brush – Slower but gives the most control and best penetration.
Work in sections of 3–5 boards at a time. Apply in the direction of the grain, starting from the top and working down.
Avoid overlapping once the stain begins to dry—this causes uneven patches.
6. Let It Dry
Drying times vary by product, but most stains dry to the touch in 4–6 hours and cure fully in 24–48 hours. Don’t lean or place anything against the fence during this time.
Common Mistakes to Avoid
-
Staining wet wood – It won’t absorb properly. Always make sure your fence is 100% dry.
-
Skipping the prep – Dirt, mildew, and old stain can prevent new stain from sticking.
-
Applying stain too thick – More is not better. A heavy coat can peel or crack.
-
Not checking the weather – A light rain after staining can ruin your hard work.
-
Spraying without back-brushing – You’ll miss spots and get uneven coverage.
Take your time, follow each step, and you’ll get a finish that looks clean and lasts.
How Long Will It Last?
Here’s how long to expect your stain to hold up:
-
Transparent stain: 1–2 years
-
Semi-transparent: 3–4 years
-
Solid stain: 4–5 years or more
To extend the life of your stain:
-
Rinse your fence every spring to remove grime
-
Trim back bushes or vines
-
Keep sprinklers from hitting the fence daily
-
Recoat at the first signs of wear
You Can Do This (And We’re Here if You’d Rather Not)
Fence staining isn’t rocket science—but it does take time, patience, and the right materials. If you’ve got the motivation and a good weekend of weather, you can absolutely tackle it yourself and get great results.
That said, not everyone wants to spend their Saturday covered in stain. If you’d rather skip the prep, tools, and cleanup, we’re here for you.
📞 Call Nordic Colors Painting at (707) 837-2718 to schedule a free fence staining quote.
We’ve got the tools, the crew, and the experience to get the job done right—and fast.

